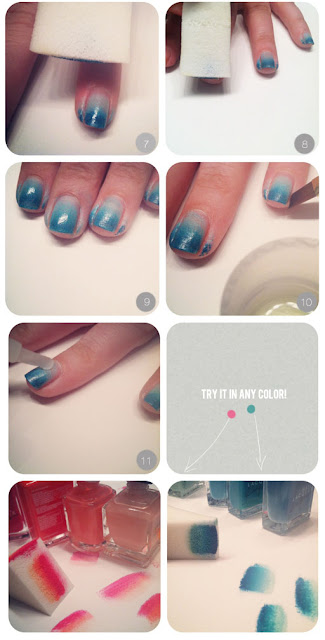
Let’s get ready to ombré! Ombré is a huge trend in this year from apparel to hair and make-up. Ombré for those of you, who are not sure, can be described as a subtle transition from light to dark colors. This light to dark saturation of color is a beautiful way to add dimension and richness to fabrics, hair, eyes and nails.
Supplies
Nail art is easy to do in an ombré look. There are only a few steps to take and there are very few supplies needed.
Before starting gather the following supplies:
Before starting gather the following supplies:
- Three small sponge sections maybe about four by five centimeters each
- Base coat
- Three nail polishes ranging from light to dark, depending on your collection could run a spectrum of pinks, blues or oranges
- Top coat to seal the look
Once all of your supplies together, find a stable flat working area like the kitchen table or vanity. Get ready to experiment with the ombré nail look!
Ombre Nail Art Photo Tutorial Part I: Mixing Colors
Step-by-Step Instructions
- Apply base coat to nail and allow drying per manufacturer’s instructions.
- Apply the lightest of your nail polish colors. Apply a very lightly coat the base color in the lightest shade, as you will be applying a lot of colors in layers don’t overdo it.
- Apply the second darkest shade polish onto the top two thirds of the nail. Apply the same color polish to the small sponge. Then with sponge gently stipple or blend the two shades on the nail together. Repaint the top part of the nail but don’t interfere with you earlier work of blending the two shades together. Keep in mind you want a gradual transition from light to dark, blend the line but make sure each color stands out on its own.
- Apply the darkest color to just the tip of the nail and again repeat the directions in step two. Apply darkest shade to sponge and bled with color used in step three with a gentle motion.
- If you want to really smooth over the gradual colors of the nail then use another sponge with the light bottom coat to dab up down the nail. This step is optional depending on how blended you want you ombré look.
- Once you have completed applying your three colors of polish. Apply top immediately do not allow the bottom coats to dry! With colors still wet top coat will serve to seal in the color gradient and the final look.
Enjoy ombré for its rich and luxurious elements it brings to your nail art. There are so many color combinations available here to mix it up. If you are into a minimalist look try, white, grey and black for a very dramatic easy to match nail looks. Spring and summer would be amazing in three of your favorite pink hues. If you want to add a sassy vibe to your ombré look do a top coat in glittery silver or gold.
Choose your Occassion and Outfit
Now that you have perfected the ombré nail art, how and when to wear is the next question and easy to answer! Ombré nails are a great solution for margarita night with the girls or date night. If the occasion is margarita night with the girls, wear a complimentary tiered skirt in hot pink, salmon and shell pink. Color your nails to match skirt. Finish the look and make it pop with a flower in your hair that matches the darkest hue. Date night is perfect occasions to try a dark sexy nail in a white to black gradient. Punch up the sexy mysterious look with shiny patent leather spiked heels, corset top and your favorite black jeggings.
Ombré nails are very fashion forward but have a rich beautiful look that works for a variety of occasions and outfits. So don’t be shy about trying ombré nail trend, it can be an easy do it yourself adventure that will be the envy of your girlfriends!
